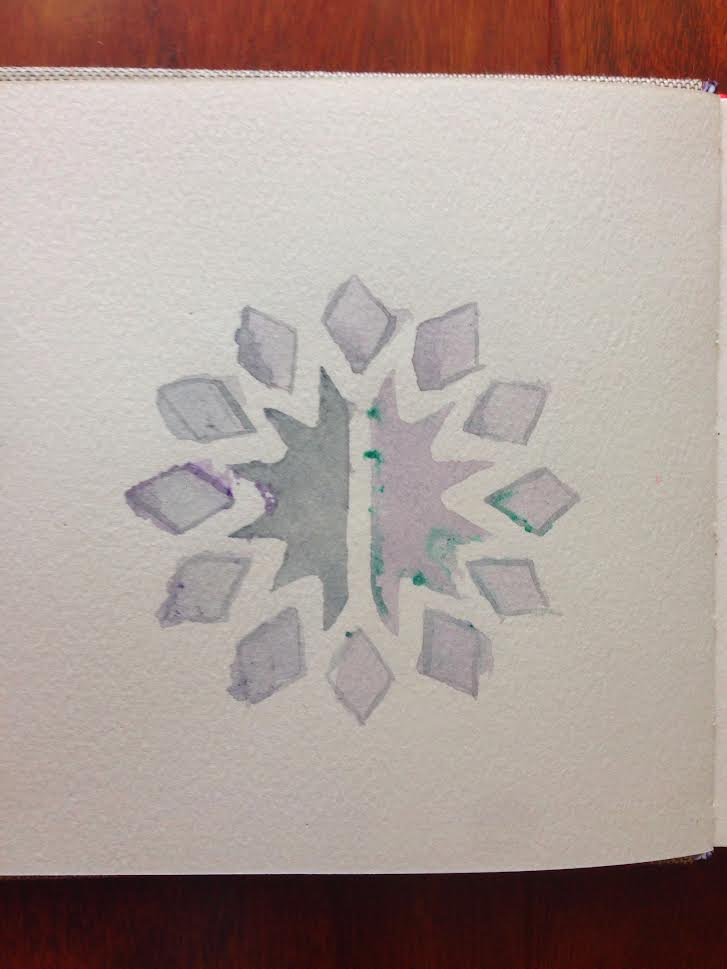
I left paint water to evaporate for thirty-four days with the intent to paint with it. I had done this in the past, but I do not quite remember the results and it was amusing, so of course, I had to do it again. I had painted something for a friend with a limited color palette, so in the end, I had two jars with paint water in purple and blue. Unfortunately, I do not have a picture of the jars before I left them to evaporate, but I do not think it is too difficult to imagine paint water in a glass vessel.
I attempted to make a color wheel with the two colors; however, the wheel did not turn out well as the colors were all almost exactly the same, and my stencil was dirty–that was my fault–and therefore it left some unwanted paint on my color wheel. Additionally, I did not make my edges very neat, and I tried to fix them with outlines, but to no avail; in fact, I consider it worse.
Besides the misshapen ferns in the top left corner and right-hand side, I quite like the floral pattern I made with the evaporated paint water. I think the painting is quite fitting to the paint water because I had made similar paintings with the paint that had created this paint water.
I hope you enjoyed my experiment and painting. Thank you for reading!
Blind contour drawings are illustrations you make by only looking at your subject and not at your page. I believe you are supposed to lift up your pen only after you have finished the piece, but sometimes I break this rule. I drew quite a few blind contour drawings in my sketchbook, so I thought I might show them to you.
(Above) I made this first page with a normal pen. I like the style that a single-width line gives to the drawings; I don’t know how to describe it, but I think it is nice. My favorite is probably the bottom left one; the mouth and the rest of the facial features are in the right place but the piece is still very whimsical. My least favorite is the drawing beside my favorite; I don’t know what that turned into. The one with the giant round eyes at the top is fun too since the proportions are all off.
(Below) I decided to use a brush pen for the second page of blind contour drawings. I don’t like the style that these are in as much, but the varied width of lines makes these more interesting. My favorite has to be the bottom right one; the expression is quite silly. I also like the top left one because of the figure’s long flowy hair and neat bun. My least favorite is the middle right one; it’s quite creepy, to be honest.
(Above) Now, enjoy a closeup of this suspicious side-eye grinning expression. He has two noses, apparently, both facing different directions.
(Above) Also, enjoy this closeup! I quite like this one as well because the lines are all over the place but the features are generally in the right location.
I hope you enjoyed looking at my silly illustrations! Thank you for reading and happy blind contour drawing 🖊
Above are all my pieces! I painted at the National Gallery of Art, Georgetown Univerſity, the Library of Congreſs, and the National Muſeum of American Hiſtory. For ſome reaſon the ſpread did not get painted chronologically; I painted the bookcaſe on the far left firſt, the arch ſecond, the bathroom third, and the univerſity laſt.
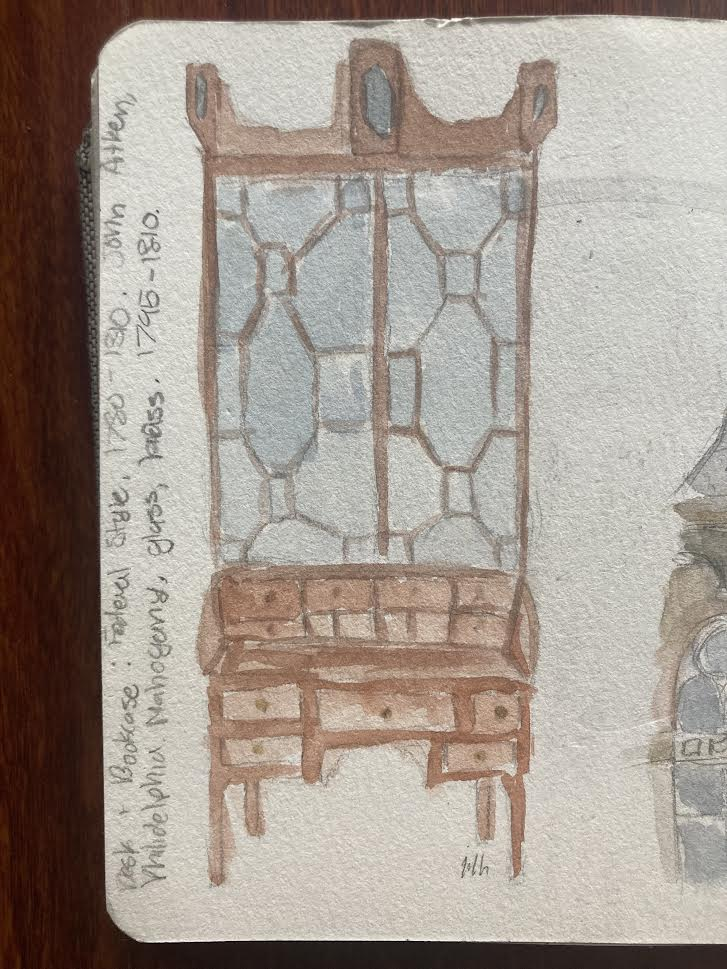
Deſk and bookcaſe in the Federal ſtyle. Owned by John Aitken in Philadelphia from 1795-1810. It is made with mahogany, glaſs, and braſs.
The above deſk and bookcaſe is probably my leaſt favorite out of the four paintings. It does not have a ſense of depth, and the ſubject is not as viſually intereſting as the reſt of the pieces. Howbeit, I love the glaſs pattern and the bright blue color of the glaſs. Below, you can see the embelliſhments at the top of the bookcaſe are not blue, but I decided to make them blue for two reaſons: the firſt is that the blue is more intereſting, and the ſecond is that as I finiſhed painting the piece, I did not have acceſs to a photo and therefore my painting was inaccurate.
Georgetown Univerſity is in the gothic architecture ſtyle. The building has quite a bit of little details, ſo it was very fun to sketch and then paint. I did not capture even half of all the details on the univeriſity, but I think the lack of detail ſuits the ſtyle I painted it in. The whole building is kind of just gray, ſo I tried to uſe warm grays and cool grays along with brown and blue to make ſure the painting does not look too monochromatic. If you are intereſted, you can ſee my reference photo below, though I did finiſh painting the entire thing while I was there in perſon and I did not uſe my photo.
Library of Congreſs Porte-cochère
This is moſt definitely my favorite painting. Leſs importantly, I like how it cuts off at the edge and how it makes the painting aſsymetrical. But, more importantly, I like how the inadequately executed depth leads you down the tunnel into a mysterious ſomething. The porte-cochère (which is a doorway through which vehicles can go through) is very lovely; each of the trapezoids ſeems to be pointing down the tunnel and I like the way I painted them. I do not like the ovals at the top baniſter very much, for they look a little rough and miſshapen. Similar to Georgetown Univerſity, the entire arch was gray, ſo I tried to uſe different values and layering techniques to make sure it does not look flat. I made the car at the end of the tunnel red inſtead of gray ſo that it would pop rather than blend in, though I think I did not wait until the gray watercolor was dry before I painted the car.
I attached my reference photo below; I took it in the morning ſo the light in the air was very blue.
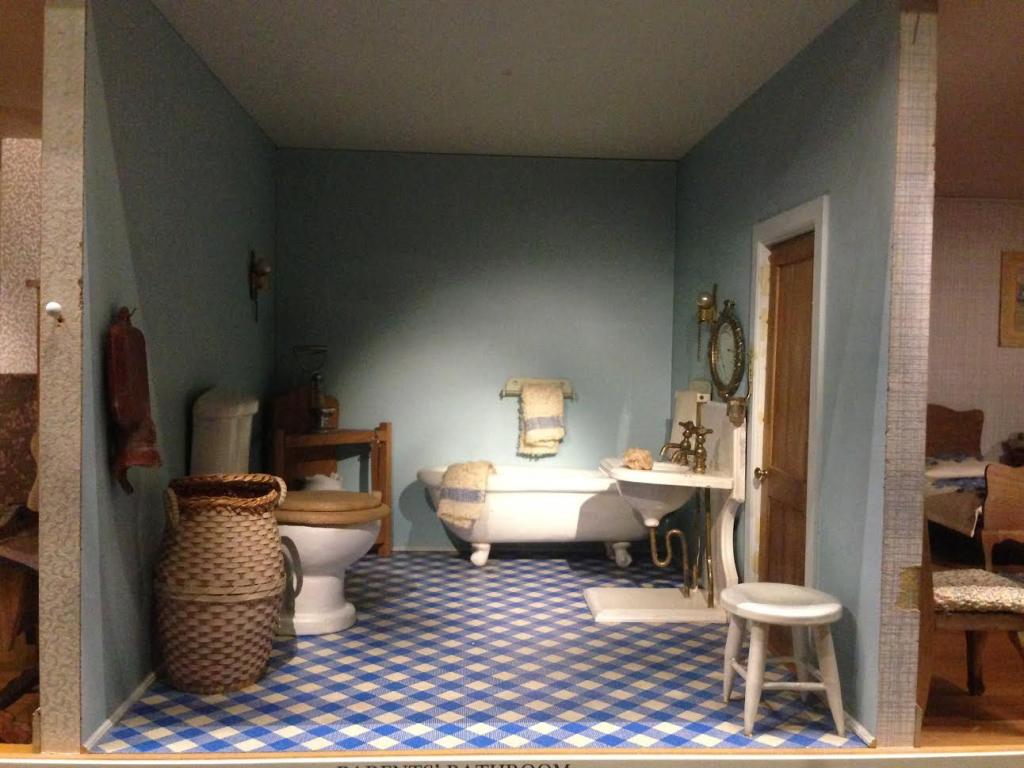
Dollhouſe at National Muſeum of American Hiſtory
There was this aſtounding dollhouſe at the National Muſeum of American Hiſtory and I juſt had to draw a room. Eventually, I ſettled on painting the bathroom; this may be an odd option for ſome, but I find bathrooms to be quite faſcinating. I did not capture the depth as well as I wanted to, but I think the painting is ſtill charming. The colors are superb in this painting, I think, though I ſuppose the colors are good in the painting becauſe they are fantastic in the actual dollhouſe. However, I added quite a bit of pink and red that did not exiſt in the actual house; I think this was a fitting choice as the colors would have been a little bit too monochromatic in my painting if I followed the dollhouſe’s colors.
Below is my reference, which I uſed to paint in with watercolor but not ſketch it.
I hope my plein air paintings were charming to look at. Which was your favorite painting? I alſo hope that the medial s was enjoyable; I fancied uſing it yet again. Thank you for reading and happy plein air painting.
I made a “plein air” painting recently–and I put plein air in quotes since I completed most of the painting inside, and besides, the part I did outside was only just outside the front door–with gouache. As thou canst see from the title, I painted my neighbor’s front garden, which is why I didn’t have to go very far to make this “plein air” painting. I used an impressionistic style since I did not quite know what I was doing.
Above is my rough sketch; it doesn’t look very understandable but ’tis good enough to be able to paint it. There are hanging succulents above and rose bushes below, along with many snake plants and a few bricks. At the edges, I drew the posts and the top, the roof.
Alas I failed to take photos of my process, so we shall skip straight from the sketch to the finished painting.
Shortsightedly, I painted the foreground before the background, and everything turned out a little bit messy, but the impressionist style lended itself to the messiness, so it turned out fine. I particularly enjoy the gray background; it makes the colors look brighter. The snake plants have a pretty mix of colors; howbeit, they are not well distinguished from the rose bushes behind. My favorite plants are most likely the hanging succulents; I fancy the shades of purple and teal.
I must also include a photo in which the sun casts delightful shadows upon the painting.
I hope you liked my painting and the occasional improperly used Shakespearan term. I thank thee for reading and farewell till it be morrow.
Richard Scarry’s Best Story Book Ever contains a cute page with a bunch of flowers and garden related things on it, so I decided that I would draw some of them. This book is really, really fun to read and look at even though it is made for kids a lot younger than me. There are a medley of pages inside that have many types of the same kind of item (like the flower page below), so it is useful if you want to copy something.
I decided to draw six flowers. Well, I actually drew five; one of the drawings I chose to do was the little seedling located near the center of the left page.
I also drew the lily of the valley (located at the bottom left corner of the right page), the violet (bottom right corner of the left page), the pink (above the bunny in overalls), the thistle (top right corner of the left page), and the aster (center of right page).
And below are my finished drawings! I decided to use colored pencil since I wasn’t feeling like taking my paint and all the supplies that go with the paint out. I think the pink flower is my favorite; the petals have a smooth gradient and the edges are simply more interesting than the other petals’ edges. The violet is probably my least favorite since the leaves in front of the violet are kind of ugly. I also like the aster; it’s a little bit more complex than the others and it turned out nicely.
I hope you enjoyed my copies of the flowers from Richard Scarry’s Best Story Book Ever. Which was your favorite flower? Thank you for reading and happy gardening 🥀
With a clothing order came a little piece of paper with a pretty bouquet (the back probably had cleaning instructions or something like that), and I decided to keep it! I kept it in my sketchbook and recreated it with watercolors.
Here is the photo and painting! I definitely did not draw it anywhere near realism, but I think it still looks cute. The flowers and leaves and leaves are my favorite part; I think they have some sort of depth. The bottle isn’t that nice looking–it seems kind of flat–and the threads on the screws of the bottle are weird.
I put white paint stuff (that is actually for covering mistakes) over the painting, so if you view the painting from the bottom you can see the texture difference very clearly. I think it’s a fun effect.
I recently read Grounded: The Adventures of Rapunzel by Megan Morrison. It was a really fun book; I recommend reading it if you’re into fairy tales. I actually had this book for a few years, but the first time I read it, the book seemed boring. But when I finally decided to read it again, it ended up being an exceptionally exciting book. Today I am going to draw a character from the book (Glyph) and animate her a little bit.
(This post won’t include any spoilers for the book unless you count knowing Glyph’s existence and her appearances a spoiler.)
Glyph is a fairy who has a broken wing (for reasons I won’t disclose; it’s not very important to the book and it’s revealed very early in the book, but I won’t tell anyway). Here is her description:
The fairies parted in front of her, revealing a red marble dais on which a fairy wearing a pale blue sheath rested in what appeared to be a large cupped hand made of soft red clay. Her hair was the color of a cloudless sky, and so was one of her wings. The other wing hung, dull gray and broken, down to the ground beside the hand. (Morrison 59)
So, here’s what we know:
Pale blue sheath (which is a sort of dress)
Sky blue hair
One sky blue wing
One dull gray wing that hangs to the ground
I began by sketching out Glyph. I originally had her in a dress, but I changed it to a tunic with pants because I thought that would be more interesting to look at.
On the left, I have my unedited sketch. I prefer sketching without erasing at all until I am finished. If I erase my previous lines whenever I want to fix them, it takes too long and ends up not looking as good. On I right, I have my edited sketch. After I’m satisfied with my sketch, I’ll erase all the excess lines and make the ones that I like darker and bolder.
I put my sketch into Illustrator and used the pen tool to outline all the shapes.
Then I added the face and changed the head shape. The old head shape was not right.
I added color after (keeping to the blue theme that Glyph’s description clearly showed) and then textures. I used a variety of pictures from Unsplash, but the rock photo on the wing is mine. To add the photos on, I created a clipping mask and lowered the opacity down to around ten to twenty percent. Every piece beside her facial features has a texture. Her skin even has a texture; I overlaid a papery photo, though you can’t see it very well.
I honestly don’t know what to think about her; the style is kind of weird. All the textures make a very childish art style, though I suppose that is fine.
I created a background for Glyph next. It looks quite odd, but I think Glyph looks really cool on top of it (I won’t reveal that just yet because I want it to be a surprise). Again, I used lots of textures. Though Glyph isn’t always on top of a red marble dais, the description mentioned her on one, so I used rocky textures and deep, earthy reds.
Then I made a stop motion set of scenes. Usually, I use the “Video Timeline” option in Photoshop, where you drag different objects around, but this time I decided to create separate frames for the “Frame Animation” option. It ends up being choppier, of course, but I think the choppiness will lend itself nicely to the style of Glyph.
I spent quite a bit of time figuring out how long I wanted the animation to last, but I settled on 0.3 seconds for each slide. Glyph moves around a little bit in each frame because of the way I pasted in my pieces into Photoshop, but I find it kind of cute.
I made her healthy wing flutter, her head tilt, and her smile move a little.
Before I close the post, here are all the images I used for the textures, minus the one I took myself: ocean for wing, hair for hair, textile for tunic, textile for belt, leather for pants, paper for skin, sand for background, rock for background, and painting for background.
I hope you like my iteration of Glyph! Have you ever read Grounded: The Adventures of Rapunzel? If so, what did you think of the book? Thank you for reading and happy animating!
PS: I spent a lot of time figuring out how to quote and cite the book, but I’m almost as happy about the citation as the animation haha.
Works Cited
Morrison, Megan (2015). Grounded: The Adventure of Rapunzel. New York, NY: Scholastic Inc..
This year I am taking an art class, so I thought it would be fun to share all the pieces I made from last semester.
The Moon and the Sun
The first project we did was a Zentangle. For the project, we were supposed to split the page in half and draw a shape on both halves but mirrored. On the left-hand side, the shape would be filled in with black, and on the right-hand side it would stay empty and there would be a Zentangle drawing all around it.
I chose to draw a circle–yes, it is a very simple shape, but I had a reason for it–so that the left side could represent the moon and the right side could represent the sun (with all the light rays coming off). I tried to do art deco patterns, but not all of them ended up being art deco like the circles, the peacock feather teardrops, and the other circles. I think the seashell patterns (the big fan one and the little one in the corner with angled lines) and the overlapping rhombus patterns turned out the best.
We also had to submit nine practice squares of Zentangle, so here are mine! I really like the checkerboard one in the lower-left corner along with the repeating squares with circles at the top center, but I copied the squares with circles from online.
Inside the Atrium
For our one-point perspective assignment, I created an iteration of an Eichler house. Eichler houses are known for (at least I’m pretty sure they are known for) their atriums, where the atrium is sort of indoors but there is a big open window at the top (no glass). You can see the window at the top. I didn’t really know what to put inside the atrium, so I just put in a dining table. That was kind of a boring choice in the end.
I made a kitchen on the right side and a living room on the left, and those rooms are separated from the atrium with a piece of glass. I tried to add a layer of watered-down white paint to make it seem kind of fuzzy, and I think it worked alright, but only alright.
I don’t like that the vanishing point and horizon line are there, but we had to keep them there for the assignment. I used some watered-down gouache to color in the house.
Outside the Atrium
We also did an isometric drawing project, and this time I used Illustrator since we were allowed to do it digitally. I decided on making the exterior of my one-point perspective house. I also added a corner window (two windows that join together at the corner), which I like a lot 😊
For another project, we made a color wheel with three complementary color scales. I used gouache and a lot of tape to keep the edges of the shapes clean. Many of the colors in the complementary color scales ended up being brown, so they didn’t look very different from each other. I think the yellow and purple looks the best, though they all look kind of bad.
We did a cross-hatching project, so I sketched out a computer mouse. Everything is kind of gray and mushed together, but I still really like the mouse and how the light reflects off of the surface.
Beetle
Finally, my final! I made a Japanese beetle with lots of colors and I used gouache and colored pencil. I really like how it turned out and I think the shell and the legs are quite pretty. I think I made the gap between the abdomen and thorax a little bit too big, but it doesn’t look too bad. My favorite features are the little bright purple flaps on the sides of the tail end.
I think I covered almost all of my pieces! Our class also did Inktober, among many other sketches. Thanks for reading and see you again soon 🙂
I finished fixing the photos. Thanks for your patience!
Hi friends! I don’t know why I keep forgetting when I’m supposed to post. But I still remembered 😁 Today I’m going to show you to make a sketchbook. I love making sketchbooks because 1) I save money 2) it’s more customizable and 3) the sketchbook lays flat.. It’s super easy, but a little bit tedious. I adapted the sewing technique from Layers of Learning (I made a book for Medieval History once. I don’t even know if the sewing technique is the same…).
You will need:
Paper (I’m using watercolor paper)
A pen or pencil (a light color would be ideal. I used an erasable pen.)
A ruler
A paper cutter (you can use scissors but this way more efficient.)
Needle and thread
Large needle
Foam sheets or thin cardboard for a cover
Scissors
Sewing machine (optional; you will still need needle and thread)
Start by drawing lines on your paper where you want cuts/folds. I like small sketchbooks, so I split my 9 by 12 paper into fourths.
Then, cut your paper. If you only want to get two pages from your piece of paper, then DO NOT CUT your paper. Note: for the sewing to work, you need to have two pages on each piece of paper. Make sure you cut on the same edge for each piece of paper.
Here are my pages. I wanted to have a wide sketchbook, so I cut the paper along the long edge.
Next, fold each piece of paper in half. Make sure to line up edges; it’s fine if you don’t fold right on your drawn line.
Then, sew along the fold/line. I used a machine since it’s quicker (I am borrowing my grandmothers), but you can sew it by hand. I sewed each piece of paper separately, but if you are using drawing paper or printer paper then you can sew up to four sheets together.
Then sew back and forth, by hand, through all the stitches together to connect the papers together.
I wrapped a cloth around the end of the paper and fixed it with a large binder clip.
Next, cut a piece of cardboard or foam out as a cover. Make sure to take into account how thick the spine is.
We’re almost done! Draw dots on the spine where you want the stitches to be.
Then poke all the dots you drew earlier with a large needle.
Finally, thread a large needle with thick thread or quadrupled thread. Sew together the loops on the spine to the cover through the holes. I made X’s on the top and bottom because I put two too many rows of holes, but I didn’t want them to be empty.
Aaaaand you’re done! Here is my sketchbook. I’m planning to buy some stickers from my shop and Sunshine Stickers to decorate my sketchbook. You can also paint/draw on the cover with non-water soluble paint/pens/markers.
I hope you enjoyed this tutorial! If you have any questions on the instructions, leave them in the comments. I’d love to know how your sketchbook turned out if you made one. Also, I recently updated the stickers on my shop, so they are all kiss cut now instead of a square. Plus, I added a new gallery collection of some succulents that I drew with watercolor pencils. Have a great day!